
At least once a year/season you’re going to want to get your motorhome out and give it a good clean. Most of our guests have informed me they give their motorhome a good clean at the start and end of the camping season. During the camping season, they will give their motorhome a quick clean. However, it won’t be as comprehensive as when they clean their motorhome at the start/end of the camping season. The reason is as you will see below, to properly clean a motorhome its actually quite a lot of work. Its not as simple and easy as cleaning your car for instance. For example, its pretty rare that when you are cleaning your car you would need to use a set of step ladders.
Also, the sheer size of many motorhomes and the many nooks and crannies means a proper clean can take several hours, if not a whole day.
So with this post, I’ll discuss how to properly clean a motorhome, including the hardest job of all, cleaning the roof.
I’ve previously written several posts on how to and how not to clean various aspects of caravans. For instance, how to clean a caravan roof and how to remove black streaks.
While much of the cleaning process and applicable products are very similar when cleaning a motorhome, there are several subtle differences. Therefore, I wanted to write a separate post on how to clean a motorhome.
My post on how to clean roof lights is applicable to both caravans and motorhomes. So I won’t be covering that again in this post.
Hopefully, you have the time to read this full post. If not, please use the Table of Contents below to jump to a particular aspect of how to clean a motorhome you are interested in. Enjoy 🙂
Disclaimer: Hey! By the way… any links on this page that lead to products on Amazon or Caravan Guard are affiliate links, and I earn a commission if you make a purchase, with no additional cost to you 🙂
- Dissolves waste and removes odours naturally and has delightful mild fragrance
Want To Visit Horton Common? – Book Here
Table of Contents
Introduction On How To Clean A Motorhome
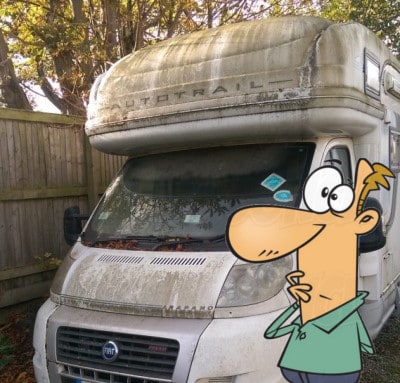
The image above is a pretty extreme example of a dirty motorhome, but it can happen.
Parked under a tree gives moss, algae and general biofilm the perfect opportunity to turn a motorhome from white to green.
However, even if your motorhome is not parked under a tree, given enough time, it will still turn green.
If you have purchased a used motorhome and the owner has not cleaned it for some time, it may actually look like the picture above.
If that’s the case, its first proper clean to remove all that green and associated black streaks is probably going to take you a couple of days instead of a couple of hours.
The problem is dirt attracts dirt. The longer algae and moss are left on a motorhome, the harder it is to remove.
The sun bakes the dirt onto the surface and into the grain of the paintwork and plastic/fibreglass mouldings. To avoid a big clean taking so much time in the future, it pays to do a light clean but often.
Water Availability & Usage When Cleaning
Now, its going to be a lot easier to clean your motorhome if you have a mains water supply available. Ideally, you’ll also have a hosepipe available.
It will just make the whole process of cleaning your motorhome much simpler and quicker.
If your motorhome is not kept in a location with a mains water connection is it possible to clean it by taking fresh water with you and a bottle sprayer.
However, you are under more pressure, as you don’t want to get halfway around cleaning your motorhome and then run out of water.
With regards to using a bottle sprayer to rinse down your motorhome, they’re not ideal. You have to use one hand to hold the bottle and one hand to hold the spray lance.
If your only opportunity to wash your motorhome is at a storage yard with no mains water access, you could consider investing in a backpack sprayer.

If you don’t have access to mains water (hosepipe) a backpack sprayer is a more practical and safer alternative to a spray bottle. Especially when it comes to cleaning the motorhome roof as you will have a free hand to hold onto the ladders: Image – Amazon.co.uk

Cleaning With Warm/Hot Water?
As we all know, when cleaning, hot water helps to lift dirt off surfaces.
There is a reason why your dishwasher has a hot wash setting even though most of the time, its possible to clean with the low temp settings. Sometimes you need hot water to get the job done.
However, also bear in mind what happens if you put certain plastic products in your dishwasher.
They come out misshapen and deformed. Now, also bear in mind your motorhome has lots of plastic components, such as the windows.
Using warm water, which you can still put your hand in, should be fine and will aid with the cleaning process.
However, never use water which is ‘hot’. Hence you can’t put your hand in, and never use boiling water.
You could damage/deform plastic parts and rubber seals used in various places on your motorhome.
Using A Pressure Washer To Clean A Motorhome
If you have mains water available, I would encourage you to use a hosepipe and concentrated spray nozzle. As I’ve stated above, it will make the process of cleaning your motorhome a lot easier.
However, I would discourage the use of a pressure washer.
I think the potential risks to rewards of using a pressure washer to clean a motorhome just don’t add up.
If there are seals/sealant on your motorhome which is not 100%, using a pressure washer could get water past that seal.
Furthermore, you don’t want water inside the roof vents, which would be easily done with a pressure washer.
Finally, you definitely don’t want water blasted against the gas heater or fridge vents. Now, you obviously still have to be careful of this when cleaning with a hosepipe/spray nozzle.
But when using a pressure washer, its much easier to make a mistake which you could end up regretting.
How To Clean A Motorhome Roof
The best place to start when cleaning a motorhome is the roof. The reason is if you clean the sides and then the roof, the dirt from the roof will wash down the sides of the motorhome.
Hence, no one wants to do a job twice unnecessarily, so start with cleaning the motorhome roof first.
Within my posts, I like to provide as many helpful tips and advice as I can. However, when available, I also like to add videos to provide a visual example.
Caravan Guard has produced two videos on how to clean motorhomes. The first video below provides a good example of how to clean a motorhome roof:
So first, you have to set yourself up and get the required tools for the job. When it comes to the ladders, you want a set that is sufficient in height but also stable.
Really, for additional safety, you would want someone to spot you while on the ladders.
Some people, instead of using self-supporting step ladders, choose to lean the ladders up against the side of their motorhome.
Well, obviously, if you are going to take this approach, you want to pad the top of your ladders, so they do not damage your motorhome.
Long Reach Telescopic Brushes
In my previous post on cleaning a caravan roof, I talk about the benefits of using a telescopic brush.
A telescopic brush means you can use one single brush to clean the areas of the roof within easy reach and the centre of the roof.
Also, if you have mains water available and a hosepipe with some telescopic brushes, you can connect up to the brush.
Having fresh, clean water running through the brush head makes it a lot easier to remove the significant volume of algae/moss/biofilm you will typically find on a motorhome roof.

Ideally, choose a long reach telescopic brush with a hose connection. Most of them do but a couple don’t, so just look out for that: Image – Amazon.co.uk
A quick note on buckets: Now, I usually don’t like to point out the obvious too much in my posts.
However, there is something worth noting about cleaning buckets, especially with a telescopic brush head such as the one above. With your standard household cleaning buck, that brush head is not going to fit.
So what I would suggest is you use a large 60L flex bucket. I now use flex buckets all the time for my various DIY jobs and work around Horton Common.
They are extremely handy and versatile. Using a flex bucket with some warm soapy water is going to be the easiest method for using a large brush head to clean the roof of your motorhome.
Motorhome Cleaning Detergents & Creams
The first thing I want to state is never use dishwashing detergent to clean your motorhome.
Now, I would have never originally thought to point this out, but it has been a question asked in some of the forums.
While dishwashing liquid may get your plates clean, what many people are not aware of is that its actually corrosive to metal surfaces.
So what detergent should you use? Some people use car washing detergents. While these may be fine for use around the motorhome cab, they potentially can be too abrasive around the rest of the motorhome.
Even if you own a panel van conversion which in most senses is a commercial van with acrylic windows, standard car detergent is not ideal.
A mild detergent designed for motorhomes such as Fenwicks is a common choice with motorhome owners, including many of our guests.

Fenwicks is the most common detergent I’m aware of that our motorhome guests using. Its safe for use on bodywork and acrylic windows: Image – Amazon.co.uk
While Fenwicks is a great general cleaning detergent for your motorhome, it may struggle to lift off stubborn dirt and marks.
That’s where a product such as Silky cream cleaner can be very useful. Along with a brush and liberal application of the cream, you can get the dirt off from around the roof vent seals, TV aerial, gutters and awning rails.
It really is brilliant stuff, and my father uses it on his caravan each year to clean those particular areas.

Silky cream cleaner is a non-abrasive cleaner and it still does an excellent job of cleaning dirt off various surfaces found on a motorhome: Image – Amazon.co.uk
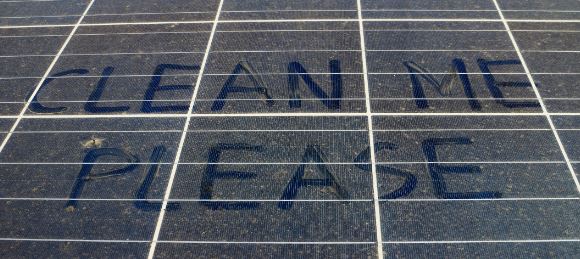
Take Care When Cleaning Solar Panels
If your motorhome has a solar panel fitted to the roof, you will want to give it special attention and care when cleaning. A dirty solar panel is a less efficient solar panel.
Therefore, getting the build-up of algae and moss off the solar panel surface is important to retain the maximum charging potential to your leisure battery.
However, when cleaning the solar panel, you don’t want to be too rough. For instance, be careful around the solar panel mounts and cable seal/connection box.
If you didn’t have the solar panel fitted yourself when cleaning the roof, its a good time to inspect it.
Some installers, when bonding the mounting feet to the roof, do a poor job. They either don’t clean the roof surface properly before applying the bonding agent or just use the wrong type of product.
I read a forum post once where someone found out their solar panel mounting feet and been bonded to the roof with just silicone, that’s bad practice.
Therefore once you have cleaned the solar panel inspect those mounting feet. If they seem at all loose, get that sorted as soon as possible.
You don’t want that solar panel coming loose and flying off the back of your motorhome on the motorway.
Cleaning The Front, Sides & Rear Of A Motorhome
Ok, now the roof of your motorhome is clean, that’s arguably the hardest part of cleaning a motorhome out of the way. You now what to focus on the front, sides and rear of the motorhome.
How long this will take and how hard it will be will obviously depend on how long its been since the motorhome was last cleaned.
Also, if this is the first wash after winter, that will typically take you much longer than a clean during the spring and summer months.
While I want to make some of my own comments/advice on this cleaning stage, again, Caravan Guard have produced a detailed video on the process, which is worth a watch.
Its quite humorous though, for one of the team to describe it as ‘a very filthy motorhome‘ as I’m sure you’ll agree, its not.
So as the video shows, even after cleaning the roof of your motorhome, you are still not quite done with those ladders yet.
Due to the high sides of a typical coachbuilt motorhome, those ladders will still come in handy along with your telescopic brush. This is especially true if you have an over-cab bed motorhome.
Without a ladder/telescopic brush, you wouldn’t be able to clean the fibreglass moulding of the over-cab bed without literally climbing on your bonnet. Which I’m sure you don’t want to do.
Again, as shown in the video, if you have mains water available, connecting up a hose to your telescopic brush will make the cleaning process a whole lot easier.
Motorhome Black Streak Removal
I’ve previously written a comprehensive post on black streak removal, so I won’t repeat myself too much in this post. What I did just want to acknowledge though, is the use of the Mellerud black streak remover.
Its not a commonly used product as yet in the UK, its mainly seen in the EU. Fenwicks also produce a black streak remover product.
As yet, I’m not aware of any of our motorhome guests who use the Mellerud cleaning products. Therefore, I’m not sure how Mellerud compares to the offering by Fenwicks.
Generally, the Fenwichks product can remove most black streaks. However, sometimes it does struggle with streaks that have been there for a long time.
Its worth noting that the Silky cream, as referenced above, can also be used to remove black streaks, and it does a good job of it.
In my opinion, its more effective than Fenwicks product. However, per litre, it is also more expensive.
Therefore, I am curious how the Mellerud black streak removal product compares to Silky Cream Cleaner. Its worth checking the latest reviews of each to see how effective people are finding each product.

Is Melleruds black streak remover more effective than the product offered by Fenwicks or the Silky Cream Cleaner? I’m not sure: Image – Amazon.co.uk
The Two-Bucket Method
In the video above, the two-bucket method is demonstrated for cleaning the motorhome. The first bucket contains the applicable cleaning detergent and warm (not hot or boiling) water.
The second bucket contains just clean cold water. They demonstrate dipping a cleaning mitt (which are great, by the way) into the first bucket with soapy water and onto to wash the motorhome.
You then dip the dirty mitt into the second bucket of just cold water before placing it back into the first bucket for more soapy water. It is quite a good system.
It means that the soapy water stays cleaner and lasts for longer before it needs to be emptied and refreshed.
It simply means you can get more ‘bang for your buck‘ with your chosen motorhome cleaning detergent.
Cleaning Windows With Your Hands?
The video above from Caravan Guard on how to clean a motorhome is the first I’ve come across that recommends cleaning the acrylic windows on a motorhome with your hands.
I understand why they would recommend this approach, even though some may regard it as being over-cautious.
It is true though, as stated in the video, acrylic windows can scratch very, very easily.
So if you are not careful and you use the same cleaning mitt which you have been using on the rest of your motorhome, it may have trapped grit which ends up scratching your windows.
Now, if there was grit within the mitt it would also be scratching the rest of your motorhome body, you just wouldn’t notice as easily.
The two-bucket cleaning method is a good means to reduce grit issues on cleaning mitts and cloths, but its not infallible. Therefore its not a bad idea just using your hand to clean the windows.
If it was cold, you could put on a pair of thin latex gloves. You would still feel the grit through them and stop moving it over the surface of the window.
If you do notice any scratches fear not, they are repairable. Just read my post on how to repair window scratches.
Autoglym Fast Glass
Now, I very rarely state on this blog to use one cleaning product over another. I usually just reference a couple of options and recommend reading reviews before you make your choice.
However, let’s say your motorhome windows are free from the majority of the dirt, but they still need a final clean from water spots etc. I would actually, at the moment, only recommend Autoglym Fast Glass.
The reason being many car glass cleaning products contain alcohol-based cleaning agents. These can actually denture acrylic windows. So can using methylated spirits, acetone or Isopropyl alcohol.

Autoglym Fast Glass is currently the only product I’m aware of which can be used on both glass and acrylic plastic windows safely: Image – Amazon.co.uk
Cleaning Motorhome Wheels
Now, cleaning motorhome wheels can be very different compared to cleaning caravan wheels. You see, caravan brakes are drum brakes.
Hence, you don’t get hot brake dust landing on the surface of the wheel. Brake dust can actually corrode the clear lacquer coat on alloy wheels.
If your motorhome has steel wheels with wheels, trims is not so much of an issue. But if you have alloy wheels on your motorhome, the key to stopping brake dust from causing damage is to clean the wheels frequently.
You will probably find products such as Fenwick’s motorhome cleaner is not going to clean the wheels that well.
Silky cream may be able to lift off the brake dust, but it still may potentially look pretty dirty. There is also the option of dedicated wheel cleaners, but use them with caution:

Be careful using alloy wheel cleaners. Many contain very abrasive and corrosion chemicals. Hence improper or overuse can cause serious damage to the paint finish on alloy wheels: Image – Amazon.co.uk
Polishing & Protective Products
Your motorhome has gone from green to clean, so your work is done, yes?
Well, you could stop there, but if you spend a little bit more time to apply protective finish products, your cleaning efforts will last longer.
The video above references a couple of different polishes and spray-on waxes you can use, and there are lots of products to choose from.
The two products that many of our guests and I think provide the best value for money are the two Fenwicks products of Bobby Dazzler and Overwinter Protector.
I discuss the use of Overwinter Protector in my post on caravan winter storage tips.
They are similar protective products for use at different times of the year. Bobby Dazzler is applied after cleaning during the spring, summer and autumn months.
Where not surprisingly, Overwinter Protector is applied before the winter months.

I do personally rate the use of Overwinter Protector. I find it does make that first major clean in spring a whole lot easier: Image – Amazon.co.uk
What these products effectively do is to give your nice clean motorhome a low resistance slippy surface finish.
Hence, new dirt, algae and moss find it harder to grip onto the surface. Meaning more of it will come off when it rains.
These products are not miracle cures though, you will still have to clean your motorhome every couple of months.
With their application though, what it does mean is that when it comes time to clean your motorhome that dirt comes off more easily.
You also often notice black streaks are not as prominent and are easier to remove. Hence they are worth considering.
Conclusions On How To Clean A Motorhome
Something you will have noticed from both of the videos above is how frequently you need to rinse down the motorhome during the cleaning process.
You cannot really see which areas are clean or dirty without frequently washing them down with clean water.
Hence, while you can technically clean a motorhome at a storage yard without mains water, its a much harder job.
Due to our fully serviced pitches having two taps, I do have some motorhome guests who bring a hose pipe with them to do a bit of cleaning.
Now you have read this post, you may also be interested in how to clean an awning.
I hope you found at least found some of this post useful on how to clean a motorhome. I also hope at some point in the future, you will consider coming to visit us here at Horton Common.
We have a road, and all our pitches are hard standing. Hence our facilities are excellent for motorhomes. 🙂
FAQ
Not really, it will just make the job a lot harder and require more water for rinsing off. On a sunny day, the dirt will quickly dry on the surface if you leave it too long before rinsing off. Therefore, if you have to wash your motorhome on a sunny day wash small sections at a time and rinse with fresh clean water frequently.
Using a pressure washer on a motorhome cab should not cause issues. However, where the motorhome cab joins the habitation area using a pressure could damage/penetrate the seal. There are various other seals and vents around a motorhome where the use of a pressure washer could cause issues. Therefore, the use of a pressure washer should really be avoided when cleaning a motorhome.
Want To Visit Horton Common? – Book Here