
You’ve spent a lot of money on your motorhome and you want to keep it in good working order. Not only for your motorhome to retain its value but also so when you want to use it you’re confident its been properly maintained. Now, many people have their motorhome serviced by a garage that will (should) change the fuel filter. However, I know a couple of our guests who like to work on/maintain their own motorhomes. The fact that you’re reading this post is a good sign you’re also interested in carrying out maintenance on your own motorhome.
Therefore, with this post, I’ll discuss how to change a fuel filter on your motorhome. The steps below and the video will reference a Fiat Ducato, the most common motorhome base vehicle currently used in the UK.
However, the process and tools are very similar to other motorhomes based on the Ford Transit or Mercedes Sprinter.
When it comes to vehicle and engine maintenance there are two trains of thought. Those who believe you fix something only when it breaks and those that believe in preventive maintenance.
I personally fall into the latter category, especially when it comes to a vehicle like a motorhome.
A motorhome isn’t typically a vehicle you do use every day. But when you do use it, you will often travel a considerable distance.
With your car, for instance, as you use it frequently, you get to notice the little issues, that, over time sometimes turn into big issues.
As most people don’t typically use their motorhome every day, they wouldn’t notice issues as easily, hence preventive maintenance is important.
That includes changing the oil filter, checking the oil level, changing the air filter and in the case of this post, changing the fuel filter.
Disclaimer: Hey! By the way… any links on this page that lead to products on Amazon or Caravan Guard are affiliate links, and I earn a commission if you make a purchase, with no additional cost to you 🙂
- Dissolves waste and removes odours naturally and has delightful mild fragrance
Want To Visit Horton Common? – Book Here
Table of Contents
Introduction – How To Change A Motorhome Fuel Filter
So as stated above, I’m going to reference the process of changing a fuel filter primarily based on a Fiat Ducato.
Most of our guests have motorhomes based on this chassis/engine, and that’s also the case across the UK. The process is very similar (almost identical) on the Peugeot Boxer and Citroën Relay.
The reason is, all of these vans are fundamentally the same as they were produced in collaboration.
The process (size of fuel filter/access etc) is slightly different on motorhomes based on a Ford Transit or Mercedes Sprinter.
However, the same core principle of how and why you would change a fuel filter is the same.
Why Do Motorhome Fuel Filters Need Replacing?
The fuel tank in your motorhome is probably not as ‘clean’ as you think. In other words, there is more than just diesel in there.
Various types of contamination can be in there from bits of grit and dirt. If that contamination enters the engine itself, it can damage seals/gaskets and maybe even scratch the cylinders.
Therefore, the job of the fuel filter is to stop that from happening. The problem is as the filter does such a good job of this it eventually gets blocked up.
Hence, your engine will get less fuel and experience poor performance. Typically, the standard industry advice is to replace a diesel fuel filter every 10,000 to 25,000 miles.
That’s obviously quite a wide range. Therefore check what your motorhome owner manual states.
With a motorhome that is used infrequently, but when it is used its used heavily personally, I would err on the side of caution. Hence, changing the motorhome fuel filter around every 10,000 miles.
However, let’s say you have purchased a used motorhome. The previous owner may have stated that the fuel filter was regularly changed, provide receipts as evidence etc.
Personally, the first thing I would do is change the fuel filter along with the oil and air filters. A fuel filter may also need to be changed due to leaks.
Now, this is not specifically an issue with the filter itself. It’s to do with the nitrile rubber seal used to assemble the filter housing.
Fuel actually attacks this seal, and it eventually fails. Hence, if you see fuel running down the outside of the filter housing, this is commonly a sign the seal has failed.
A new seal comes included with a new fuel filter.
How To Change A Motorhome Fuel Filter Video Guide
Now I’m not a mechanic; I’m just a DIY enthusiast.
Therefore, to provide some authority on the process of how to change a fuel filter on a motorhome I’ve included the video below from Practical Motorhome and Diamond Dave.
After the video below, I’ll ‘flesh out’ the process, referencing the tools Dave is using to avoid damage to the fuel filter housing and the actual filter replacement.
Dave does a great job of thoroughly explaining the process of how to clean the housing and replace the filter.
However, he doesn’t really discuss how to remove the filter housing from the motorhome in the first place. Therefore, that’s where I’ll start.
Quick note though, make sure you have some latex/nitrile work gloves before you start. You don’t want diesel on your hands.
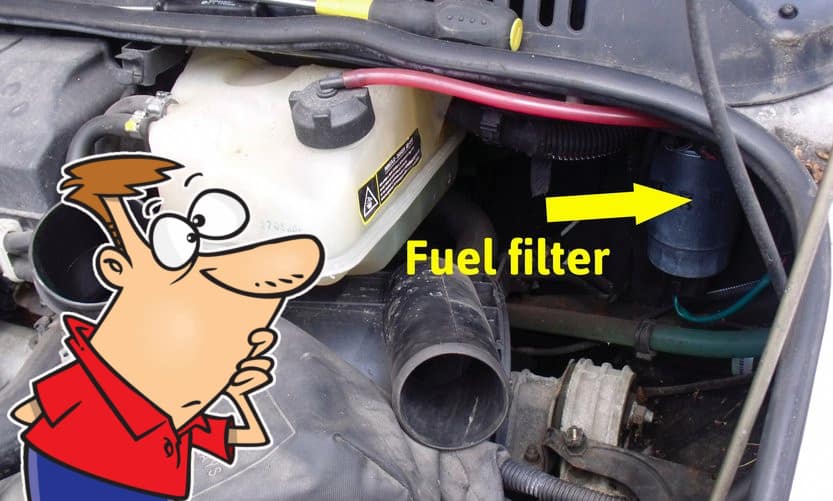
Step 1: Removing the Motorhome Fuel Filter
So you will find that the fuel filter housing is fixed against the bulkhead inside the motorhome engine bay. It slides over a bracket. Therefore it needs to be lifted slightly before it can be removed.
However, before you lift the fuel filter off the securing bracket, you will need to disconnect it.
First, disconnect the top electrical connection to the ECU, which monitors fuel flow. In some, but not all cases there is a second sensor/electrical connection on the base of the fuel filter housing.
If its present, this is actually a water sensor and will cut the engine if water is detected. To unclip this sensor and get access to it, you may actually have to remove the nearside headlight.
Finally, you need to disconnect the diesel fuel line. In the video above, at the end, you can see Dave simply push in the fuel line. Well, to remove it, you need to push in that light grey collar.
Once that light grey collar is depressed you can pull back the fuel line to remove it. When you carry the fuel filter housing over to your workbench remember its full of diesel fuel, so carry it vertically.
Step 2: Securing & Separating The Fuel Filter Housing
For the next part of the process, you really need a bench vice and the special tool below to hold the fuel filter in position and to remove the cap.
You could maybe use a portable workbench, but it won’t be as stable. Whichever method is available to you, never clamp the fuel filter housing in the vice directly.
If you do, its likely you will distort or crack the plastic filter housing. In that scenario, you would have to replace the whole fuel filter housing assembly.
As you can see in the video above, Dave uses the cradle tool, which is clamped in the vice, and the fuel filter housing sits inside.
The second part of this kit is a tool to unscrew the housing cap with the square drive on a spanner/torque wrench.

If you want to replace the fuel filter on your motorhome this is an essential bit of kit to safely disassemble the fuel filter housing: Image – Amazon.co.uk

Step 3: Replacing The Old Fuel Filter For A New One
As Dave disassembles the fuel filter housing, you will notice he is being very careful to clean the screw threads on the housing first.
The reason being he doesn’t want contaminants entering the housing. You have to remember inside the fuel filter housing is the ‘clean’ side, hence after filtration.
Therefore anything inside that housing will end up in the engine. Don’t use household paper towels to clean the fuel filter housing. It often separates and leaves behind small fibres.
Only use a heavy-duty paper roll that won’t tear and leave fibres behind as contamination.
Once the old fuel filter has been removed, you may want to empty out the filter housing of diesel. There may be contaminants in there, maybe even water.
But don’t just tip it down the drain. That’s actually illegal. Put it in a container and empty it into a suitable waste disposal facility at your local recycling centre.

This Bosch fuel filter will fit a Fiat Ducato 130 Multijet commonly found on many motorhomes. It also comes with a replacement rubber seal: Image – Amazon.co.uk
Now, you obviously need to check you’re purchasing the right fuel filter for your motorhome. On many websites, such as Amazon, you can enter your reg number, and it will show fuel filters that will fit.
As Dave shows in the video above, don’t touch the new fuel filter with your hands/gloves, they could be contaminated.
Hold it with the plastic bag and pull back the bag after the new fuel filter is secured onto the housing cap by simply pushing it into position.
Then place the new nitrile seal on the housing before inserting the new fuel filter and cap.
Step 4: Re-tightening The Fuel Filter Cap Housing
In the video, Dave shows using a bit of Vaseline around the screw thread and the new nitrile seal. This is a good tip I would encourage you to follow.
Also, before you place the locking ring into position, make sure the new seal is properly seated. If not, it may get caught between the screw thread and the locking ring and be damaged.
You are going to need a torque wrench to re-tighten the locking ring. Its a delicate balance of being tight enough not to leak fuel and not so tight you crack/split the housing.
As Dave states in the video, set the torque wrench to 30nm. This will close up the housing just enough to create a seal without damaging it.
Step 5: Re-fitting The Fuel Filter Housing & Priming
Once the new fuel filter and seal have been inserted and the housing is back together, its ready to go back inside your motorhome.
You may want to try and clip the bottom sensor cable on first before you slide the housing onto the bracket.
In some cases though, the signal cable is so short, you have to put the fuel filter housing on the bracket first.
Then connect the top sensor cable and, finally the fuel line. Before you try and start your engine, the fuel filter needs to be primed with diesel.
This will also force the air out of the filter housing and back into the fuel tank. Follow the process Dave does in the video.
Turn the ignition key for 10 seconds, the fuel pump will engage and push fuel into the housing while expelling the air. You may hear air bubbling back into the fuel tank, this is completely normal.
Repeat this process 3-4 times, and you should be good to go!
A Leaking Motorhome Fuel Filter Housing
When you removed the fuel filter housing, you may have seen diesel on the outer surface.
This may have been due to a failed seal, so once the new filter and seal and been used, hopefully, the leak will have stopped.
However, if you are still noticing a leak after the new filter/seal replacement, the housing itself may be warped or cracked.
The cause for this may be that the previous owner/mechanic didn’t use the special plastic cradle tool above and held the filter housing directly in a vice.
Alternatively, the housing could be cracked simply due to age, wear and tear. The heat generated in the motorhome engine bay over time can distort and denature the plastic housing.
First, I would suggest removing the filter housing again and checking the new seal is sitting properly. If you are sure that it is a whole new fuel filter, housing may be your only way forward to stop the fuel leak.

There are several companies online that supply whole new fuel filter housings for motorhomes: Image – Amazon.co.uk
Conclusions On How To Change A Motorhome Fuel Filter
If you are willing/interested in changing the fuel filter yourself on your motorhome, I hope the above information was of some use.
I also previously wrote a post on motorhome engine remapping to provide more power and improve MPG figures.
Well, anyone who is considering such a modification should also make sure their fuel filter is changed and in good condition.
There is no point changing the map on the engine to deliver more fuel/power if that fuel cannot actually get into the engine due to a dirty fuel filter.
I also hope you consider at some point in the future coming to visit us here at Horton Common to experience our hard standing fully serviced pitches which are perfect for motorhomes.
Thanks for reading 🙂
Want To Visit Horton Common? – Book Here