
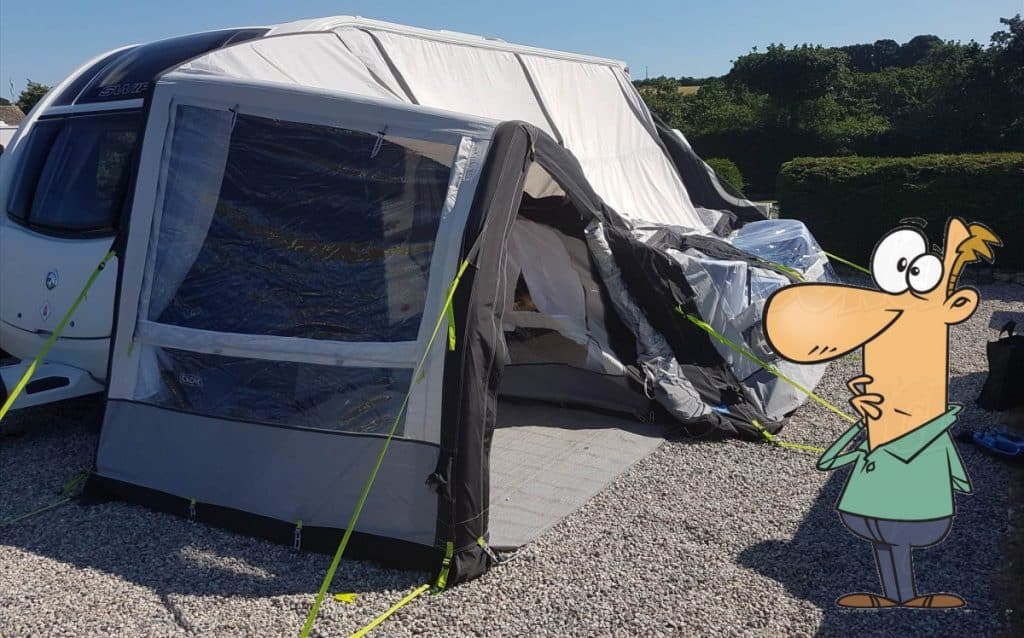
One of the very first posts I wrote on our blog was Caravan Air Awnings – Are They Any Good?. We have some guests who own air awnings and love them. We have others who won’t even consider them. However, more and more of our guests are visiting us with an air awning. In general, they have had a very positive experience setting up and using their air awnings. However, I have had a guest in the past inform me the did have a leaky air tube on their awning, which they had to have replaced. Therefore, I thought I would look into what are the options on how to repair an air awning. Is replacing a leaking support beam on an air awning always the best option, or can it be repaired?
Now, before you start purchasing air awning repair kits or replacement air bladders, check your warranty terms and conditions. For instance, Kampa has a 2-year warranty on their Airframe/Airpoles.
This 2-year warranty term appears to be pretty standard with the other air awning manufacturers, such as Vango. Therefore, any air pole which leaks within this time period should be replaced under warranty.
However, you may want to take a repair kit shown below with you on holiday in case a leak does happen. That way, you can repair the leak.
If that air tube is still under warranty, when you get back, you should contact Kampa, Vango or the retailer you purchased the air awning from for a replacement air tube.
Now that’s covered, below I’ll start to discuss the actual process of how to repair an air awning.
Disclaimer: Hey! By the way… any links on this page that lead to products on Amazon or Caravan Guard are affiliate links, and I earn a commission if you make a purchase, with no additional cost to you 🙂
- Dissolves waste and removes odours naturally and has delightful mild fragrance
Want To Visit Horton Common? – Book Here
Table of Contents
Introduction To How To Repair A Leaking Air Awning
When I write my posts, I like to reference the best information/videos on whatever subject I’m discussing.
As most of our guests have Kampa air awnings, it would seem a previous obvious choice to use Kampa’s advice on how to repair an air awning.
I’ve included Kampa’s video on how to repair an air awning. However, I do have issues with it, which I’ll discuss.
Therefore, after the official video from Kampa on how to repair an air awning tube, I’m also going to include a video from Keith & Michele of Carefree Caravanning, which I actually think is a much better example of how to repair a leaking air awning tube.
Air Awning Valves, Collars & Conical Washer/Split Rings
While I do have issues which I’ll discuss with the official video above from Kampa, on how to repair a leak. I do think the diagrams at the start of the video are very useful.
These demonstrate the key components of how each tube is joined together and the isolation valves.
You really need to pay attention to how the conical washer split ring fits inside the collar. Conical obviously means shaped like a cone. Hence one side of the washer is narrower than the other.
Once you have repaired your air awning tube, the narrower side of the conical washer must be placed into the securing collar.
If not, an airtight seal will not be formed when you tighten the collar up to the valve.
Hence, you may put air back into the tube only for it to go flat again. You may then start thinking your repair has failed when the actual issue is the orientation of the conical washer.
So its very important you put that back in the right way round.
Three Piece Air Awning Poles
The Kampa air awning poles are made up of an outer sleeve, a protective sleeve and finally, the internal bladder inner tube.
As you can see from the video above, once the outer and protective sleeves are unzipped, they reveal the inner bladder tube which is actually made from a pretty thin plastic material.
To be able to remove the bladder’s inner tube, first, the valves have to be isolated on both ends. The outer and protective sleeves can be unzipped, and the bladder’s inner tube can be removed.
My Issues With Kampas Official Method On How To Identify The Leak & Using Repair Tape
This is where the official video from Kampa on how to repair an air tube starts to falter. First, the video presumes you have been able to identify which tube is actually leaking.
The video then states, ‘inflate the bladder to identify the puncture‘.
The isolation valves are no longer fitted to the bladder, so how are you supposed to inflate it?
The presenter connects up a pump to one end and must have blocked the other air inlet but doesn’t show how.
Then the hole appears to be in the centre of the air tube. I don’t think this is a very good method to help you identify where the leak is, more on that below.
When it comes to the actual repair, the presenter simply cuts a piece of the adhesive repair tape and just sticks it over the hole.
I find this bizarre as this is not the method stated on the repair kits actually provided by Kampa?
Therefore, I’ll now discuss what I think is a better method to identify an air awning leak and how to repair a leak by Keith & Michele of Carefree Caravanning, along with some of my own additional comments.
How To ‘Actually’ Repair A Leaking Air Awning Tube
So the video below, filmed by Keith & Michele, is of them repairing a leak on their Kampa Rally Air Pro 390.
However, the process and repair are very similar to how you would approach a repair on pretty much any make of air awning from Vango or any other manufacturer.
The Kampa Rally Air Pro 390 is an awning a couple of our guests have.
The twin bay design is sort of halfway between a full awning and a porch awning, and the size appears to work well for couples with pets as well as families.
How To Identify Which Air Tube Is Leaking
As you can see from the video above, the method Keith & Michele used to identify which air beam was leaking was simple but effective.
They closed all of the isolation valves on each of the air awning support beams and cross beams.
They then left the awning like that overnight, and in the morning, it was obvious it was a lower cross beam which was suffering from a leak.
It was interesting to see that it wasn’t the beam that either Keith or Michele suspected of leaking.
As noted by Keith in the video, a leaking support beam (the big long ones) is a whole different ‘kettle of fish’ to the smaller cross beams.
The reason is, you can take out individual cross beams and leave the awning standing. To repair the main support beam, you would have to take it out once the awning had been lowered.
Therefore, if you did this leak test and the next morning found it was one of the main support beams which were leaking, your best bet is to try and leave the repair until after you take the awning down.
Hopefully, its not a bad leak. Hence once all the valves were reopened by giving the awning the odd additional pump, you would be able to keep it standing.
So you don’t forget which air beam you need to repair after your holiday, mark it in some way.
How To Identify Where The Leak Is On The Air Awning Tube
As I discussed above, the method to identify the leak in the official Kamp video, I don’t think, is going to work for most people.
Keith, in their video, tries a method common to anyone who’s tried to find a puncture on a bike tyre in the past. Put air into the tube and submerge it in a bucket of water.
However, as Keith shows, with these air awning tubes, you are not able to close off the air without using both hands, which makes it very difficult to find the air leak using a bucket of water.
Afterwards, Keither simply filled the bladder with water and observed where the water was coming out, which proved much more effective.
The leak was around the seal of the air valve, and I wouldn’t be surprised if this area is where most leaks occur on other air awnings.
Using The Inflatable Repair Kit
Using the Kampa inflatable air kit below, Keith & Michele do a good job of repairing the leak.
They use the included alcohol wipe the clean the area before adding lots of the included glue and then cutting a cross into the patch to slide it over the air inlet.
They followed the instructions on the kit, hence why their video is actually better than the official Kampa repair video.
In that video, the presenter doesn’t use the alcohol wipe to cleanse the area and also doesn’t use the additional adhesive.
Therefore, in that example, its likely that repair wouldn’t last too long before that leak occurred again.
Now, something that must be noted is the inflatable repair kit in the image above only includes 2 x 75mm circular repair patches.
While these are ideal for the repair that Keith & Michele had to carry out around the air valve, they’re not ideal for larger holes/tears elsewhere on the bladder.
Also, in the official Kampa repair video earlier in this post, you will notice a square repair patch was used. Just to make things complicated, Kampa has a second option called the Tent & Awning Repair Kit.

This kit comes with a 50cm length of repair tape, along with additional adhesive and alcohol wipe: Image – Amazon.co.uk

After you have used the kit, it does take 2-4 hours to properly cure. Furthermore, Kampa recommends 6-8 hours before the repaired tube is inflated again.
As Keith discusses in the video above, in hindsight, he’s not sure for the cost to replace one of the smaller air crossbeams (£20) if the effort to repair the beam is worth it.
However, as Keith notes, the larger beams cost around £50. Hence its easier to justify the time and effort to repair them.
Conclusions On How To Repair An Air Awning
While air awnings have a lot of benefits, leaks at some point during the life of an air awning may happen.
The decision on whether the time and effort to repair an air beam as opposed to replacing it is obviously a personal one.
However, what I would say is even if you would choose to just replace a beam when you’re on holiday with the awning up, that may not be an option. Local camping shops may not have one available.
Therefore, if you do own an air awning, I think the repair kits are a shrewd investment to take with you just in case a leak occurs.
What I would also note is I’ve seen air awnings cope with wind much better than traditional pole awnings because they can move with the wind.
However, too much movement could be something which ultimately leads to a leaking air pipe or even a rip/tear.
Hence, even with air awnings, you still need a good quality storm strap kit to reduce excessive movement when it gets windy. You also may be interested in my post on lights for caravan awnings.
Finally, I’ve also written posts on motorhome awnings and air vs pole awnings.
I hope the above information was useful and helps you to repair any leaks you experience with your air awning.
I also hope, at some point in the future, you will consider coming to visit us here at Horton Common. 🙂
Want To Visit Horton Common? – Book Here