From time to time, we have guests arrive at Horton Common who are caravan beginners or motorhome beginners. In some cases, they have never previously replaced a gas bottle. For those of us who have, we are aware that gas bottles, regulators and pigtail pipes are connected with anticlockwise reversible threads. Hence, to remove and change a gas bottle, you have to do the opposite of how you would normally undo and tighten a nut. Once you understand that you’re ‘good to go’ to remove and replace a gas bottle.

However, with this post, I wanted not only to discuss how to change a gas bottle in a caravan or motorhome but to discuss some other associated topics.
Such as, does your pigtail gas hose between the bottle and regulator also need to be replaced?
Furthermore, instead of replacing your gas bottle with a standard steel Calor gas bottle do you want to consider a lightweight or refillable gas bottle option?
Something else I wanted to discuss in this post is the difference between changing a gas bottle on older and newer caravans.
For instance, older caravans typically have the gas regulator fitted to the bottle. While most caravans produced within the last 15 years have a bulkhead gas regulator.
I’ve had some guests in the past confused by this and they thought they still needed to have a regulator on the gas bottle even though their caravan had a dedicated bulkhead gas regulator.
I’ll discuss gas regulators later in the post. First, let me quickly discuss a like-for-like gas bottle replacement on a modern caravan or motorhome.
Disclaimer: Hey! By the way… any links on this page that lead to products on Amazon or Caravan Guard are affiliate links, and I earn a commission if you make a purchase, with no additional cost to you 🙂
- Dissolves waste and removes odours naturally and has delightful mild fragrance
Want To Visit Horton Common? – Book Here
Table of Contents
How To Change A Gas Bottle On A Modern Caravan Or Motorhome
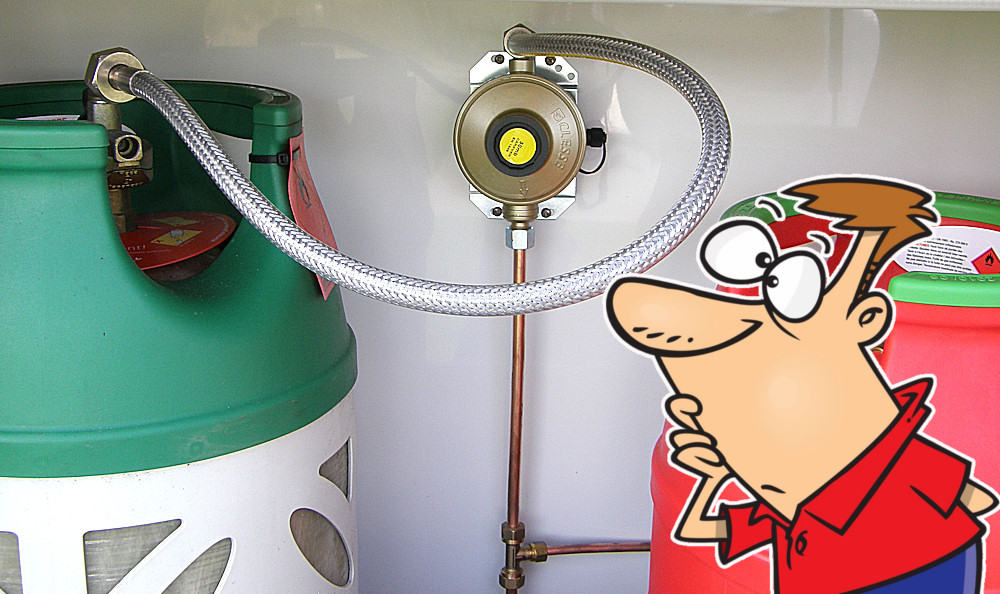
As referenced above, if your caravan or motorhome has been produced within the last 15 years its more than likely you will have a bulkhead gas regulator inside the wet locker.
Hence, there will not be a regulator fitted to the bottle itself. There will simply be a short piece of flexible gas hose between the bottle and the bulkhead gas regulator. Known commonly as a pigtail.
If you wish to see how to replace a gas bottle, the quick (under 4 min) video below is worth a watch.
So obviously, an essential tool to remove and replace a bottle is a gas bottle spanner. These are just a couple of pounds to purchase.
However, before you use the spanner on the gas hose nut you want to make sure the valve on the gas bottle is closed.
You can then use the gas bottle spanner to release the hose. Remember, to undo the gas hose nut, you need to rotate the nut clockwise.
On many LPG gas bottles, there is a little plastic cap which you can screw into the valve on the bottle to stop contaminants from getting in there.
To connect up to the new/full bottle, its simply a reverse of this process. Unscrew (clockwise) the black plastic cap from the valve of the bottle while making sure the valve is closed.
Then screw the pigtail hose onto the bottle (counter-clockwise), and once tight, you can open the valve on the bottle so the pressurized gas can flow into the regulator.
How To Check For Gas Leaks When Changing An LPG Bottle
Sometimes when you change the gas bottle on your caravan or motorhome, you may smell gas. If that’s the case, you have two options to check for gas leaks.
The high-tech (expensive) option or the low-tech (cheap) option. The high-tech option is to purchase a digital gas detector.
Our gas engineer has one of these tools, and its very good. When I had a new cooker installed, he found a tiny gas leak.
However, at the time, I asked him how much that gas tester was, and he told me several hundred pounds.
Now, there are cheaper gas detectors online, but how sensitive and reliable their readings are is questionable. Furthermore, in this instance of just changing a gas bottle, they are OTT.
Therefore, a better and cheaper low-tech option is to have a can of gas leak detector in your caravan wet locker.

Having a tin of gas leak detector spray in your caravan or motorhome wet locker is not a bad idea: Image – Amazon.co.uk
So how does gas leak detector spray work? Well, its pretty simple really. You spray it over the area where you think a leak may be present.
In this case, the fittings on the gas bottle, the pigtail hose or the pipework around the gas regulator.
If gas is leaking from any of these areas, it will cause the gas leak detector solution to foam up. Hence, you keep looking around the fittings to see if you can see any foam, which indicates a gas leak.
If the leak is around a threaded fitting giving it a quick nip-up may stop the leak. Alternatively, you may use some PTFE tape around the thread of the fitting.
During your annual caravan service, the service centre will do a more comprehensive test on the gas system in your caravan or motorhome.
Gas leaks sometimes occur due to jolts and vibrations from travelling on the road. Obviously, this includes hitting pole holes.
However, there is another potential cause of gas leaks between the gas bottle and regulator, the flexible pigtail pipe.
The Flexible ‘Pigtail’ Gas Pipe Should Be Changed Every 5 Years
When you are changing the gas bottle in your caravan or motorhome, its a good idea to inspect the condition of your flexible pigtail pipe that links the gas bottle to the regulator.
They need to be changed roughly every five years, but why? Well, all rubber-based products denature over time, and they become less flexible and rigid.
Small cracks develop, and hence gas leaks can occur. Gas leaks are fairly typical around the crimped connectors on either end of the pigtail gas hose.

You should change the flexible pigtail gas hose on your caravan or motorhome every 5 years: Image – Amazon.co.uk
However, there is another reason they need to be changed. I discuss this in more detail in my post about caravan gas regulator problems.
Its to do with how the rubber pipe is made, high-pressure gas and condensation.
Essentially the moisture within the gas starts to break down the rubber pigtail gas hose. This causes an oily liquid to form inside the pipe, which can lead to a regulator blockage.
On older caravans and motorhomes where the gas regulator is fitted on the bottle itself, this issue with rubber gas hoses was not apparent.
The reason being in that scenario, the rubber hose is only exposed to low-pressure gas, and condensation is not, therefore, an issue.

If you have a bulkhead gas regulator it will typically look like the image above: Image – Amazon.co.uk
If you purchase a second-hand caravan or used motorhome with a bulkhead gas regulator and you are not sure when the pigtail was last changed, change it for a new one.
For around £10 for a new pigtail gas hose, you can avoid the potential hassle and frustration of a blocked-up gas system. Ideally, if you can afford one (and find one), choose a stainless steel pigtail.
As they are not rubber-based and the issue described above of oily residue created by condensation in the pipe does not occur.
Hence, a stainless steel pigtail gas pipe will typically have a working life of 25 years.
How To Change A Gas Bottle ‘Older’ Caravans or Motorhomes
Ok, in this instance, with regards to ‘older’ caravans and motorhomes, I’m referring to anything built prior to around 2003.
Before 2003 it was rare to find bulkhead gas regulators. It was much more common to find ‘on bottle’ regulators.
You had to have a different regulator for butane and propane bottles, which became a pain. Hence, this was one of the reasons bulkhead gas regulators were later adopted.
Another video I wanted to reference in this post has been produced by the Camping and Caravanning Club. It discusses much of the bottle change over the process discussed above.
However, importantly around halfway through the video, they show examples of ‘on bottle’ gas regulators, which you will find on older caravans and motorhomes before 2003.
The process of removing and changing a gas bottle on a pre-2003 caravan or motorhome is similar to modern caravans or motorhomes.
The difference in this instance though, is you are not just uncoupling the flexible gas pipe.
You are uncoupling the flexible gas pipe and on-bottle regulator. When you swap an empty gas bottle for a new one, it will not come with the regulator, so you need to hold on to it.
As I referenced above, butane and propane gas bottles have different on-bottle regulators. So if you do wish to swap from one type of gas to the other, you will need a new on-bottle gas regulator.
Upgrade Options When Changing A Gas Bottle
When your gas bottle in your caravan or motorhome is empty instead of doing a like-for-like replacement, you may consider an alternative.
For instance, if you are currently using butane, you may want to consider propane.
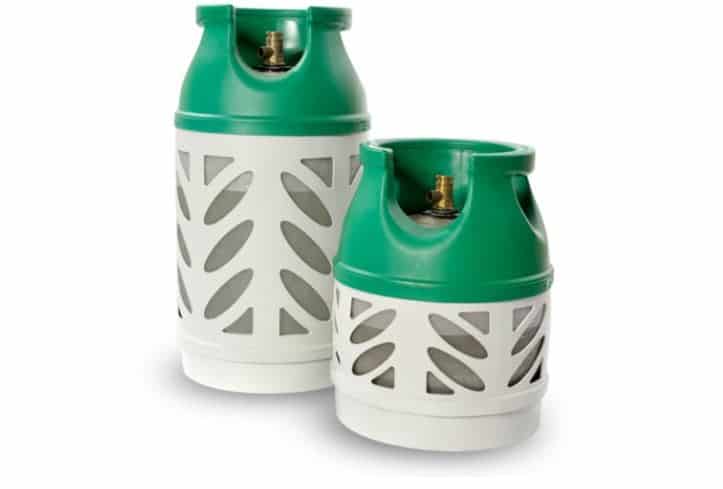
However, the other alternatives to consider are lightweight gas bottles (Gaslight) or maybe even a refillable gas bottle.
Below I’ll discuss the advantages of these alternatives to standard steel Calor gas bottles.
Butane Or Propane – What’s The Difference?
So the first potential upgrade or downgrade you could consider when it comes to standard steel Calor gas bottles is, do you want to go for butane (blue bottles) or propane (red bottles)?
Butane is the cheaper option, however, performs poorly during the colder months of the year. Propane is more expensive.
However, if you use your caravan in the early spring, late autumn or winter, you would also want to opt for propane.
If you only ever use your caravan or motorhome in the warmest summer months of the year, you will save a little bit of money by opting for butane.
As discussed above, if your caravan or motorhome has a bulkhead gas regulator, you can swap between butane and propane bottles at will.
With an older caravan or motorhome prior to 2003, which uses ‘on-bottle’ gas regulators, you will need a different regulator for either butane or propane.
The Benefits Of Flogas Gaslight Lightweight LPG Cylinders
Ok, so the key benefit with Gaslight bottles is obviously in their name, its their reduced weight compared to a steel Calor gas cylinder.
However, other than it being easier to remove and swap these Gaslight bottles, what is another benefit their reduced weight provides?
Well, last year, we actually swapped over from two steel Calor gas bottles to a single Gaslight bottle in my father’s caravan. The main reason was a healthy reduction in the caravan’s noseweight.

Previously no matter how we loaded the caravan, the noseweight has always been close to the car’s limit, partly due to our relatively heavy motor mover.
We then also thought, do we really need to take two gas bottles? My father typically only uses sites with 16A hookups, and holidays in the caravan during the summer months.
Hence, the pitch mains hook-up runs the fridge, microwave, hot water and heating in the evening. Therefore a single gas bottle is only really needed for the amount of cooking they do.
So then we also decided to go with a single Gaslight bottle instead. This has now meant the noseweight of the caravan is comfortably under the car’s rated limit.
Another benefit of these Flogas Gaslight bottles is due to their fibreglass construction, you can actually see the liquid gas in the bottle.
Hence, you have an idea when you are close to running out of gas just by looking. Quick tip, shining and torch through the bottle makes it a lot easier to see the level of the gas.
How To Change A Flogas Gaslight Bottle (Its Different To A Calor Bottle)
If you wish to consider upgrading from a standard steel Calor Gas bottle to a lightweight Gaslight bottle, the changeover is different. Gaslight bottles use a push-fit connection.
A standard flexible pigtail can be used with an adapter. However, as stated above, all pigtail gas hoses (except full stainless steel hoses) should be replaced every five years.
Therefore, if are not sure how old your flexible pigtail gas hose is, its probably worth replacing at the same time along with purchasing a new Gaslight bottle adapter.

The image above shows the push-fit and turn bottle adapter required to upgrade to a Gaslight LPG cylinder: Image – Amazon.co.uk
If you would like to see the process of changing and replacing a Flogas Gaslight bottle in a caravan, I’ve included the video below from ‘Caravan Vlogger’, aka Graham.
He discusses the process of exchanging empty for full bottles and swopping them over in his caravan’s gas locker. He shows how you use the bottle adapter above.
Its not simply a ‘push-fit’. It involves turning the handle, then pushing it in to release the bottle, and then turning it again for the gas to flow.
Upgrading To A Refillable Gas Bottle
You may have noticed on our homepage I now also reference where our guests to Horton Common can get their refillable gas bottles filled up.
Over recent years I have noticed more of our guests choosing to go for reliable gas bottles. Therefore, I wrote a guide to refillable gas bottles for caravans and motorhomes.
There are several companies that produce refillable gas bottles, including Gas IT and Gaslow. You have probably come across their adverts in caravan and motorhome magazines.
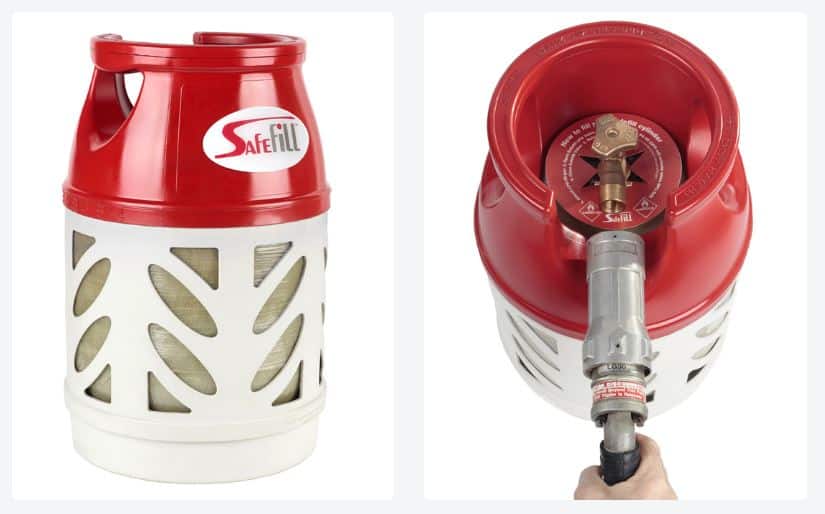
However, their solutions are more suitable for dedicated permanent installations. If you are looking for a similar experience to how you currently change your gas bottles, I think the better option is Safefill.

It is worth noting that the initial purchase price of a Safefill bottle compared to a Gaslight bottle is considerably more. Roughly we are taking between around £40 for the Gaslight and £170 for the Safefill.
If you don’t use much gas, hence you only use your caravan or motorhome a couple of times a year, the Gaslight bottle is the better option.
However, if you are using your caravan or motorhome multiple times a year, the lower refill costs with the Safefill bottles really add up.
The Benefits Of Safefill Bottles When Touring Europe
I’ve also had guests who do a lot of touring around Europe choose to go with the Safefill bottles. Not only for the reduced cost to fill them up but due to the simplicity of it.
Finding suitable places abroad to exchange gas bottles can be a real pain.
However, within Europe, there are lots of ‘Autogas’ LPG fill-up stations which you can use to top up the gas bottles.
When touring in Europe, you will also tend to use more gas because the campsites generally have lower-powered pitch hookups.
Hence, while, for instance, here at Horton Common, we offer 16A per pitch, in Europe, pitches commonly offer only 10A or 6A.
I had one guest come to visit us after their Europe trip, and they used a site with just a 3A hook-up point!
Conclusions On How To Change A Gas Bottle In A Caravan Or Motorhome
Hopefully, I’ve provided the information you were looking for on how to change your gas bottle in a new or older caravan.
I also hope I’ve provided you with some things to consider with regard to gas bottle upgrades.
While you can obviously just do a like-for-like changeover, there are lightweight and refillable options now which are well worth considering.
Lightweight gas bottles can help you reduce the noseweight and user payload. Refillable gas bottles for those who use their caravan or motorhome frequently can make top-ups much cheaper.
I also hope at some point in the near future you will consider coming to visit us here at Horton Common to experience our fully serviced pitches.
Our pitches also offer expansive views over the Staffordshire Moorlands and Peak District National Park. 🙂
Want To Visit Horton Common? – Book Here


