
As the owner of a small caravan site, I’ve seen hundreds of caravans hitch up to leave Horton Common over the years. It’s usually fairly obvious to see which guests are very familiar with the procedure and those that take more time. Everyone no matter how long they have been caravanning should take their time when hitching up their caravan. While it can be tempting to rush, especially in bad weather, rushing could potentially lead to missing an important step and an accident on the road. Therefore, while this post is mainly aimed at caravan beginners, I would encourage even experienced caravaners to review the below.

Some may disagree with the finer detail of my comments and the order in which they should be completed.
In either case, the most important thing is that due care and attention are taken when hitching up a caravan to a tow car.
Some may find some of the points below obvious. However, I often find its best not to presume.
While I’ve tried to cover the most important steps on how to hitch up a caravan, I would encourage you to browse the rest of my posts or use the search function at the top of the page to read my other caravan safety-related posts.
If you are a caravan beginner, I would encourage you to make your own checklist from the information below on how to hitch up your car and caravan.
Have that checklist with you when you hitch up the caravan, either on paper or on your phone.
Its vital for your own safety and that of other road users that each hitching up step is completed and double-checked.
Disclaimer: Hey! By the way… any links on this page that lead to products on Amazon or Caravan Guard are affiliate links, and I earn a commission if you make a purchase, with no additional cost to you 🙂

- Dissolves waste and removes odours naturally and has delightful mild fragrance
Want To Visit Horton Common? – Book Here
Table of Contents
Introduction – How To Hitch Up A Caravan
If you have read any of my other posts, you will know I like to add videos to better illustrate the points I’m making.
When I was browsing the net for suitable videos for this post on hitching up a caravan, I found lots of them. None are perfect, not even the video below.
However, it is one of the most recent videos, and that’s important. Advice has changed over the years on how to hitch up a caravan.
Notably due to changes over the years with towbars, breakaway cables and stabiliser hitches.
Therefore, I would encourage you to watch the video below and also to review my written comments on the various steps for more detail.
You can also cross-reference the video and my own comments with the official government advice.
Below I’ll cover each of the steps on how I approach the process of hitching up a caravan. It broadly follows the advice in the video above. However, there are a few steps I would like to add.
Its potentially possible to break down the steps below into even more steps. However, I’ll try and keep to the key theme of caravan and towing safety when it comes to hitching up a caravan.
Below within my text are lots of links to my other pages. Therefore, if you are looking for more details on a particular topic, just click the links, which will direct you to my applicable pages.
Step 1: Check Inside The Caravan/Payload Distribution
Before you think about raising the stabiliser legs/corner steadies and reversing your car up to the hitch, focus on the inside of your caravan.
You need to make sure your caravan is loaded correctly and that your payload weight is legal.
You’ll also want to make sure that your TV ariel has been lowered and all windows and roof lights are closed.
If you have food in your fridge, you will want to turn it onto 12V so its ready to be powered by your tow car during the journey. Its not safe to operate the caravan fridge via LPG while towing.
Step 2: Noseweight/Exterior Caravan Checks & Removing Security Devices
When you believe your possessions inside the caravan are secured and loaded correctly, you now need to check the noseweight.
The noseweight needs to be within the rated limits of the caravan and your tow bar.
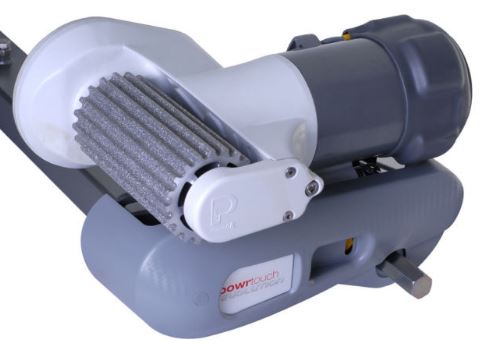
To check the caravan noseweight, you will need either some bathroom scales and a sufficiently strong piece of wood or a noseweight measuring device.
To test the caravan’s nose weight, the handbrake should be engaged, and the corner steadies raised along with the jockey wheel.
If you have a hitch lock fitted, that will need to be removed first. If the noseweight reading is within the rated limit of the caravan and tow car, then lower the jockey wheel and secure it to provide support.

Besides using bathroom scales and piece of wood there are various caravan noseweight gauges you can use: Image – Amazon.co.uk

Next, check all the exterior lockers on the caravan are closed. You may also want to consider fitting fridge vent covers while towing.
Fridge vent covers can improve the performance of the fridge in certain conditions. If you have a caravan wheel lock fitted, this obviously also needs to be removed.
Step 3: Check Your Caravans Tyre Pressures
Caravan tyre safety is one of the most important aspects of safely towing a caravan.
Let’s presume the caravan tyres are in good condition, with no sidewall cracking/bulges, and they are under 5 years old with sufficient tread remaining.
You need to make sure the caravan tyre pressure is correct using a suitable tyre pressure gauge. While you’re at it, its recommended to check the tyre pressures on your tow car too.

Make sure you have a suitable tyre pressure gauge/pump to hand to check the caravan tyres before you hitch up and start towing: Image – Amazon.co.uk
Step 4: Raise The Caravan Hitch With The Jockey Wheel
This is one of those very important steps which, if you forget, can cause problems.
You want to make sure you have used the jockey wheel to raise the bottom edge of the caravan hitch above the height of your car’s towball.
Its best to play it safe and give yourself a good couple of inches of clearance. Otherwise, when you bring the caravan hitch and tow car together, you could get a nasty surprise and a large bang on impact.

Make sure you have used your jockey wheel to raise the caravan hitch to be higher than the height of the cars towball before you reverse: Image – Amazon.co.uk
Step 5: Reversing The Tow Car Or Using A Caravan Motor Mover
I’d probably say is currently 50/50 on our guests reversing their car up to the caravan hitch or using their motormover.
If you are a single person touring with a caravan, if you have a motor mover, it obviously makes a lot of sense.
With a motormover, you can very precisely (and slowly) move the caravan hitch over the towball.
If you do use a motormover to hitch the caravan up to your tow car, make sure you remember to disengage it before you set off.
Otherwise, you could damage the motormover and your caravan tyres. You may even damage your leisure battery.
If you have a partner who can spot you with hand signals, then you should be able to reverse the car up the caravan hitch. However, there are some important points to follow.
Turn off your car radio or any other distractions, such as the fan. Then lower your windows so you can hear each other.
While visual communication when you’re reversing is best (hand movements), listening out for the keyword ‘Stop!’ is important.
Your car may also have a reversing camera. However, its use when reversing up to the caravan hitch will depend on the angle of the camera and the clarity of the image.
Older cars with reversing cameras generally produce quite a grainy image, which is not ideal for precisely locating a towball under a caravan hitch.
Now, it may take you a couple of goes to reverse the towball directly under the caravan hitch.
There is no shame in that. Just take your time. It can be tricker with a manual over an automatic and vice versa, depending on the car in question.
It also depends on how good you are at reverse creeping by feathering the clutch in a manual car.
If you are concerned about the caravan hitch hitting your car’s bumper, depending on the towbar, you could have a deflector plate fitted.
Then again, if you do have a motormover fitted, that may be your least stressful option.

Your tow car may have a bumper protector plate above the towbar. However, don’t presume it can cope with anything other than a light impact: Image – Amazon.co.uk
Quick Tip: Before you reverse the cars towball under the caravan hitch, wipe the towball with a clean cloth and a degreasing agent (methylated spirits etc).
This will enable the caravan stabiliser hitch to perform to the best of its ability.
Step 6: Lowering The Caravan Hitch Onto The Towbar
Let’s presume manoeuvring the car and caravan together has gone well, and the hitch is directly above the towball.
Lift the stabiliser handle and hitch handle on the caravan. Then lower the jockey wheel until the hitch handle snaps back down into position.
Most caravans manufactured within the last two decades have an AL-KO stabiliser hitch. This has an indicator to tell you when the tow ball is properly engaged in the hitch socket.
When this is the case, the indicator should pop up, and you should see a green ring.
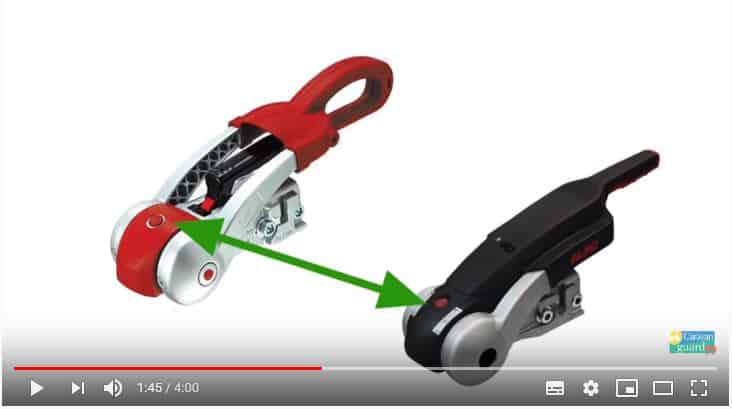
However, while the green indicator is helpful, you should give the towball connection a second check.
To make sure the car’s towball is properly engaged into the caravan hitch, carry out the following. Start to wind down the jockey wheel.
If the back of the tow car is also being lifted up, that means the towball and hitch are coupled correctly.
However, be gentle while doing this. You don’t want to put too much strain on your jockey wheel mechanism and damage it.
Once you are happy the towball and caravan hitch is connected properly, you can then wind up, lift and fix the jockey wheel ready for towing.
Make sure it is secured properly because if not when you hit a bump in the road, it could drop down and come in contact with the road resulting in damage.
You should then push down the caravan hitch stabiliser handle. You can then also release the caravan’s handbrake.
Quick Tip: You should feel a reasonable amount of resistance pushing down the caravan hitch stabiliser handle.
If that’s not the case, it may be time to replace the friction pads. This process is discussed more in my caravan servicing post.
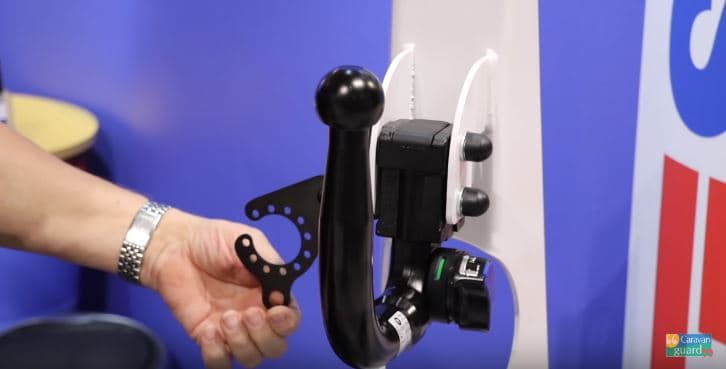
Step 7: Connect Up The 13 Pin & Breakaway Cables
How easy it is to connect up the 13-pin power cable for the caravan will depend on where the connection is positioned on your tow car.
You may want to use a head torch or similar, and you may have to get on your knees to complete the connection.
If your caravan has the AL-KO ATC stabilisation system, you should hear that engage when the 13-pin cable is connected if its operating correctly.
You should also see a green indicator light on the hitch indicating the system is in operation.
Quick Tip: Don’t let the 13-pin power connection droop down close to the ground. You may have to loop the cable over the hitch before you connect it to reduce cable droop.
However, make sure there is enough play in the cable to cope with turning/manoeuvring the caravan.
Breakaway Cable Best Practice
With regards to the breakaway cable, this is where it gets a bit tricky. I would encourage you to read my post on the latest breakaway cable best practice, link next to the image below.
As the video states above, if your car’s towbar has a dedicated breakaway mounting point, that should be used.
The problem is, there are some towbar bumper protector plates which would appear to have a breakaway cable mounting point, but its actually not strong enough to do the job.
Therefore, if your towbar manufacturer has not stated that there is a specific breakaway cable mounting point, loop the breakaway cable around the neck of the towball.
This is not ideal, but its safer than using a none specified mounting point which could snap before the breakaway cable engages the caravan brakes.
Hence making the purpose of the breakaway cable redundant.
Step 8: Checking The Caravan’s Rear Lights
To check the rear lights are working properly on your caravan. Ideally, you’ll need the assistance of a second person.
If you are travelling on your own, you will require some means to activate the brake pedal as you get out of the car to check the caravan’s brake lights.
As well as the brake lights, you need to make sure the indicators/hazard lights are working and matching the cars lights.
In other words, the right-side indicator on the car corresponds to a right-side indicator on the caravan etc.
You will also need to check the sidelights and fog lights are working. If any of the bulbs have failed, you need to change these bulbs before you set off.
Hence, its a good idea to carry a spare set of bulbs with you.
Step 9: Fitting Towing Mirrors To Your Car
Before you set off, you must also fit towing mirrors to your car’s wing mirrors. This is so you can see behind the rear of the caravan when on the road.
You will then be able to see when other vehicles are overtaking etc.
There are lots of different types of caravan towing mirrors, which you can read about in my post linked above.
Personally, I think stuck-on towing mirrors should be banned as they can fall off pretty easily during transit after hitting a bump etc.
Also, in my post on best caravan tips, I discuss an issue I was made aware of with some motorised wing mirrors.
If the car has wing mirrors which automatically tilt down when the car is put into reverse, this needs to be turned off when towing mirrors are fitted.
The reason being the tilted mirror could push the towing mirrors off or even damage the glass of your wing mirrors!

Towing mirrors have various fixing mechanisms from top or bottom clamps to straps. However, I would encourage you to avoid suction/stuck-on towing mirrors: Image – Amazon.co.uk
Step 10: Final Checks Before You Set-Off
There are a couple of checks/double checks you should carry out before you set off:
- The corner steadies are raised, and the winder is packed away.
- Any levelling ramps/wheel chocks are packed away.
- The motormover (if fitted) is disengaged from the caravan tyres.
- The gas is turned off at the bottle.
- The caravan stabiliser handle is properly engaged.
- The handbrake is off.
- The jockey wheel is lifted and secure.
- The breakaway cable is properly attached.
Conclusions On How To Hitch Up A Caravan
Now, the above list is my own personal way to approach the caravan hitch-up process. You may choose to approach the process slightly differently and in a different order.
The most important point is that all the steps above with regards to how to hitch up a caravan are completed and checked before you set off.
If you are a caravanning beginner, you may also want to check out my posts on how to tow a caravan and how to reverse a caravan.
Furthermore, if you are hearing strange noises coming from your caravan hitch while towing, you may want to read my post on how to replace hitch friction pads.
Anyway, many thanks for reading. I hope the above information was of at least some use to you.
I also hope in the near future, you consider coming to visit us here at Horton Common Caravan Site to experience our hardstanding, fully serviced pitches and amazing views. 🙂
Want To Visit Horton Common? – Book Here